Applying non-associative hatches
|
Command |
Path |
|
Hatch |
Modify |
Non-associative hatches are placed on objects or areas of the drawing with the Hatch command. They obtain most of their attributes from hatch pattern definitions, but they don’t use the color definitions for the lines that make up the hatch. Non-associative hatches obtain the color definitions from the current default attributes. They don’t use any background definitions, and therefore have no background color. A non-associative hatch is similar to a screen that displays over other objects; the spaces between the lines are empty, and display portions of any objects behind the hatch.
For information on associative hatches, see Fill attributes and Mapping hatch and tile fills.
Non-associative hatches are placed inside an area that is defined by selected objects or lines. The start point of the hatch is set with the Hatch command. Unlike associative hatches, non-associative hatches can be moved to another area or object. However, unless the new area is the same shape and size as the previous one, the pattern will not fit.
Non-associative hatches are groups that are not associated with an object. They don’t rotate with the object or act like a fill. They can be broken down into their individual elements with the Ungroup command. For a non-associative hatch to become part of an object, it must be grouped with the object.
To apply a non-associative hatch:
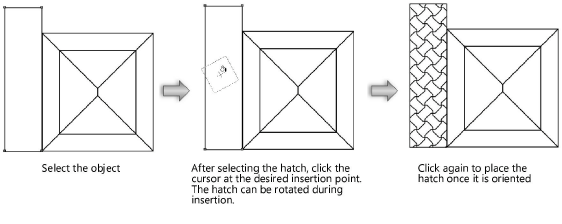
Select the object.
Select the command.
The Hatches dialog box opens.
Click to show/hide the parameters.Click to show/hide the parameters.
|
Parameter |
Description |
|
Hatches list |
Lists the available hatches from the current file (referenced hatches display in italics) |
|
Hatch preview |
Displays a preview of the selected hatch at 100% zoom |
|
New |
Opens the Edit Hatch dialog box, for creating a new hatch |
|
Edit |
Opens the Edit Hatch dialog box, for editing or renaming an existing hatch |
|
Duplicate |
Creates a copy of the selected hatch |
|
Delete |
Deletes the selected hatch; not available if the hatch is referenced |
Select the hatch to apply from the Hatches list.
A preview of the hatch is displayed.
Click OK to return to the drawing area.
The cursor changes to a paint bucket.
Position the paint bucket on the object where the hatch should begin. Click to specify the hatch origin. Drag to specify the hatch orientation and click again.
The hatch fills the space from the paint bucket’s location to the boundary created by the object.
When a hatch is being applied to an object, the tip of the paint from the paint bucket marks the hatch origin. The hatch start point within the object can be precisely specified.